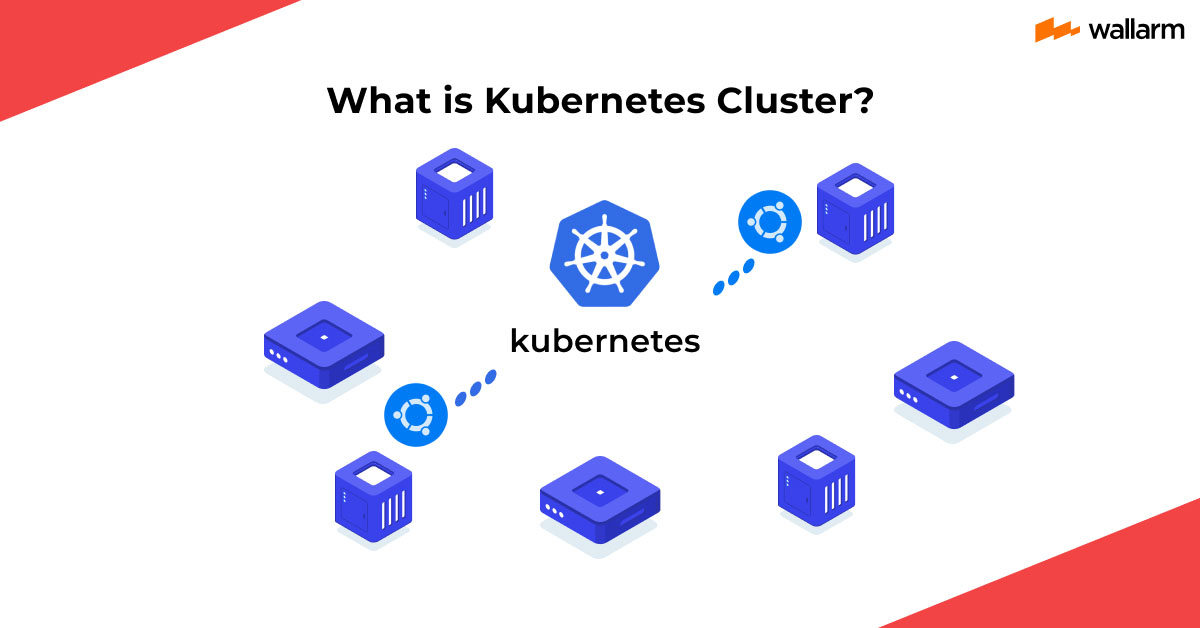
What is the Kubernetes Cluster?
Kubernetes Cluster, a friendly helper for apps and tech, makes teamwork a breeze. Think of it like a busy bee colony, buzzing with life, working together to keep the hive alive. This Wallarm guide gives you the inside scoop on Kubernetes Cluster.
In simple words, Kubernetes Cluster gathers many computer pals, called "nodes," to form a strong team. This team's mission? To host and run your app friends smoothly and efficiently. When the nodes join forces, they create a powerful playground for app buddies to live and play.
But what's the magic behind Kubernetes Cluster's teamwork? The answer lies in the Kubernetes magic wand, which helps split your app into smaller parts called "containers." These containers are like little houses for app pieces, making it easy to move them around and keep them organized. Just like a Lego castle, you can take it apart, put it together, and build new things!
Kubernetes Cluster takes care of the app neighborhood, making sure each container has a cozy home in a node. If a node feels under the weather, Kubernetes Cluster sends the containers to healthy nodes to continue their fun. This way, your app stays lively and active, even if a part of the team is taking a break.
So, there you have it! Kubernetes Cluster is like a friendly neighborhood for apps to live and play, keeping your digital world running smoothly. Stick with Wallarm's guide, and you'll learn how to harness the power of this buzzing bee colony for your tech adventures.
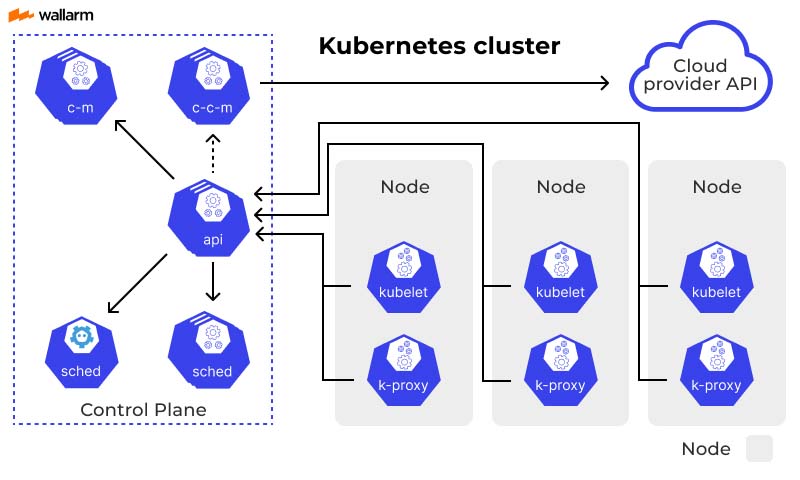
The Components of a Kubernetes Cluster
Welcome back, tech explorers! In this Wallarm guide chapter, we'll dive into the exciting world of Kubernetes Cluster components. Picture each part as a member of a superhero team, each with their unique skills and powers, working together for the greater good of your app neighborhood.
API server
Meet the Town Crier, the API server. This vocal hero announces important news and commands throughout the Kubernetes Cluster. By sharing information and updates, the API server helps the team stay in sync and ensures that everyone knows their tasks.
Scheduler
Introducing the Master Planner, the Scheduler. With a brilliant mind and keen eye, the Scheduler assigns new containers to the best nodes. This hero ensures a balanced workload and keeps the app neighborhood running smoothly.
Controller manager
Next up, the Puppet Master, also known as the Controller manager. This skilled multitasker watches over the Kubernetes Cluster, managing multiple controllers. Like a conductor of a grand orchestra, the Puppet Master ensures harmony and balance in the app world.
Kubelet
Say hello to the Node Guardian, the Kubelet. Each node has its own Kubelet, ensuring its container friends are healthy and happy. The Node Guardian checks in on containers, making sure they have everything they need to thrive.
Kube-proxy
Meet the Traffic Cop, Kube-proxy. This component directs traffic between containers and nodes, helping everyone get to their destinations safely and efficiently. Kube-proxy keeps the app neighborhood's streets clear, ensuring a smooth flow of communication.
Etcd
Last but not least, the Keeper of Secrets, Etcd. This component is like a wise librarian, safeguarding the essential information and configuration data for the Kubernetes Cluster. With Etcd, the team always knows where to find the answers they need.
There you have it, tech adventurers! In this chapter, we've met the remarkable team that makes up a Kubernetes Cluster. Each component plays a vital role in keeping the app neighborhood safe, efficient, and thriving. Stay tuned to Wallarm's guide for even more insights into this fascinating digital world.
How to work with a Kubernetes Cluster
Ready to dive into action with Kubernetes Cluster? Let's learn how to work with this powerful team of components. We'll explore some basic steps and CLI (Command Line Interface) examples to help you navigate the app neighborhood like a pro.
- Step: Set up your Kubernetes Cluster
Before joining the adventure, you'll need to install Kubernetes and set up your cluster. Tools like kops, kubeadm, or managed services such as Google Kubernetes Engine (GKE) and Amazon Elastic Kubernetes Service (EKS) make this process a breeze.
- Step: Meet kubectl, your trusty sidekick
Kubectl is the trusty tool you'll use to communicate with your Kubernetes Cluster. It's like your personal walkie-talkie to the cluster, allowing you to send commands and check in on your team. To install kubectl, follow the instructions in the official Kubernetes documentation.
- Step: Deploy your app neighborhood
Now it's time to bring your app to life in the Kubernetes Cluster. First, create a YAML file that describes your app's components, like a blueprint for the neighborhood. Then, use the kubectl tool to deploy your app using the following command:
- Step: Keep an eye on your app neighborhood
As the neighborhood's overseer, you'll want to check in on your app's performance and status. Kubectl has got you covered! Use these handy commands to monitor your app's health:
List your app's nodes:
Check the status of your deployments:
Peek at your running pods (container homes):
- Step: Update and scale your app neighborhood
Your app neighborhood will grow and change over time. Kubectl makes it easy to update your app and scale it to meet demand. Here are some helpful commands to keep your neighborhood running smoothly:
Update your app with a new YAML file:
Scale your app by adjusting the number of replicas:
And that's it! You're now equipped to work with a Kubernetes Cluster and manage your app neighborhood like a seasoned pro. Remember, practice makes perfect, so keep exploring and experimenting with different kubectl commands to become a true Kubernetes Cluster superhero.
Kubernetes Cluster Management
In this chapter, we'll explore the art of managing your Kubernetes Cluster. Like a master gardener tending to their plants, you'll learn how to keep your app neighborhood healthy, efficient, and thriving. Let's dive into some essential management tasks and CLI examples to help you become a Kubernetes Cluster virtuoso.
- Rolling updates and rollbacks
Change is inevitable, and your app neighborhood needs to adapt. With Kubernetes, you can perform rolling updates, allowing your app to evolve without disruption. To update your app's image version, use this command:
Sometimes, updates don't go as planned. Don't worry, Kubernetes has your back! You can rollback to a previous version using this command:
- Managing resources and quotas
A thriving neighborhood needs resources. Kubernetes lets you manage resources like CPU and memory for your app's containers. Define resource requests and limits in your YAML file, and Kubernetes will make sure your app gets what it needs.
To set resource requests and limits, add the following to your YAML file:
You can also set resource quotas to limit resource usage within a namespace. Create a YAML file with your desired quotas, and apply it with kubectl:
- Auto-scaling the app neighborhood
Sometimes, the app neighborhood gets busier. With Kubernetes, you can auto-scale your app to handle increased traffic. Use the Horizontal Pod Autoscaler (HPA) to automatically adjust the number of replicas based on CPU usage.
To create an HPA, use this command:
- Organizing the neighborhood with namespaces
As your app neighborhood grows, it's essential to stay organized. Kubernetes uses namespaces to group resources, like a filing cabinet for your app components.
To create a new namespace, use this command:
To list all namespaces, run:
- Monitoring and logging
Keeping an eye on your app neighborhood's health is vital. Kubernetes offers built-in monitoring and logging tools to help you spot issues and analyze performance.
To access logs for a specific pod, use this command:
For more advanced monitoring, consider integrating solutions like Prometheus and Grafana or using managed services like Google Stackdriver and Amazon CloudWatch.
And there you have it! With these Kubernetes Cluster management techniques under your belt, you're ready to cultivate a thriving app neighborhood. Keep practicing and experimenting to become a true Kubernetes maestro.
Creating Kubernetes Clusters
In this chapter, we'll learn how to create a brand new Kubernetes Cluster from scratch. Imagine yourself as an architect, laying the foundation for a bustling app neighborhood. We'll explore various methods for setting up your cluster and provide CLI examples to guide you along the way.
Creating a cluster with kubeadm
Kubeadm is a popular tool for creating and managing Kubernetes Clusters. To build your cluster with kubeadm, follow these steps:
Install kubeadm, kubelet, and kubectl on each node by following the official Kubernetes documentation.
Initialize the control-plane node using this command:
Set up your local kubeconfig to access the cluster:
Join worker nodes to the cluster with the command provided by the kubeadm init output:
Creating a cluster with kops
Kops is another powerful tool for creating and managing Kubernetes Clusters, especially on AWS. Here's a simple guide to setting up your cluster with kops:
Install kops and kubectl following the official documentation.
Create an Amazon S3 bucket for storing your cluster's state:
Configure the kops state store:
Create the cluster configuration:
Build the cluster:
Creating a managed Kubernetes Cluster
Managed Kubernetes services like Google Kubernetes Engine (GKE), Amazon Elastic Kubernetes Service (EKS), and Azure Kubernetes Service (AKS) simplify the cluster creation process. Here's how to create a GKE cluster as an example:
Install the Google Cloud SDK and kubectl by following the official documentation.
Authenticate with your Google Cloud account:
Set your default project and zone:
Create the GKE cluster:
Get the cluster's credentials to access it with kubectl:
Congratulations! You now know how to create Kubernetes Clusters using various methods. With a solid foundation in place, you're ready to build and manage thriving app neighborhoods. Keep exploring and experimenting to find the perfect approach for your unique Kubernetes adventure.
How to Secure Kubernetes Clusters
In our final chapter, we'll explore the vital topic of securing your Kubernetes Cluster. Like a watchful guardian, you'll learn how to protect your app neighborhood from harm and keep it safe from threats. Let's examine essential security practices and fortify your Kubernetes Cluster.
- Control access with Role-Based Access Control (RBAC)
RBAC helps you manage who can access your cluster and what they can do. By defining roles and binding them to users, you can control access with precision. To create a role and a role binding, use these YAML files as examples:
- Secure API server communication
Ensure all communication with the API server is encrypted and authenticated. Use TLS certificates and client authentication to secure connections. Configure the API server with flags like --client-ca-file, --tls-cert-file, and --tls-private-key-file to enforce secure communication.
- Enable network policies
Network policies help you control the flow of traffic between pods. By defining ingress and egress rules, you can secure your app neighborhood's communication. Here's an example of a simple network policy YAML file:
- Use admission controllers
Admission controllers can validate and mutate incoming API requests, acting as gatekeepers for your cluster. Enable and configure admission controllers like PodSecurityPolicy, ResourceQuota, and ImagePolicyWebhook to enforce best practices and prevent misconfigurations.
- Scan images and enforce policies
Regularly scan container images for vulnerabilities and enforce security policies. Tools like Trivy, Clair, and Anchore can help you identify potential risks. Use admission controllers to enforce image security policies and prevent vulnerable images from being deployed.
- Monitor and audit
Monitoring and auditing are crucial for detecting and responding to security incidents. Tools like Prometheus and Grafana can help you monitor your cluster's performance and health. Use Kubernetes audit logging and solutions like Fluentd, Elasticsearch, and Kibana to analyze your cluster's activity and identify suspicious behavior.
And with that, our journey through Kubernetes Cluster security comes to an end. By applying these practices, you'll create a safe and secure environment for your app neighborhood to flourish. Keep exploring and refining your security skills to become a true Kubernetes Cluster protector.
FAQ
References
Operations: Cloud Monitoring & Logging - Google
Elastic Kubernetes Service (EKS) - Amazon
Google Kubernetes Engine (GKE) - Google
Azure Kubernetes Service (AKS) - Azure
Subscribe for the latest news

.png "AWS with Wallarm")